How to remove background in GIMP?
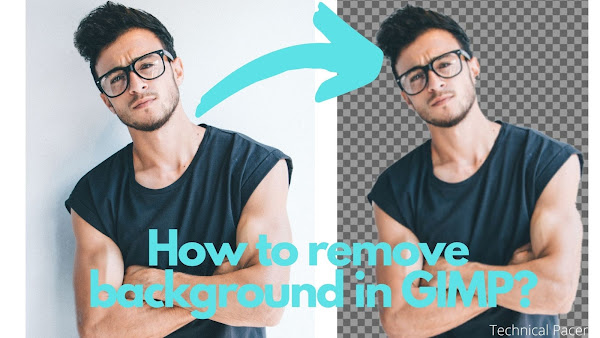
We’ve all been there — you’ve got a logo, a product photo, or a portrait and you need the background gone. So you search for an online background remover, upload your image, and get back a result that’s… okay at best. Rough edges, mangled fine details, and anything that isn’t a clean solid-colour background completely confuses the algorithm.
The problem with these online tools is that they run a fixed algorithm. It works for the images it was trained on and struggles with everything else. What you actually need is manual control — and that’s exactly what GIMP gives you.
GIMP is free, professional-grade photo editing software with precision selection tools that rival paid software like Adobe Photoshop. In this guide, I’ll walk you through 3 methods to remove a background in GIMP — each suited to a different type of image — and show you exactly how to save the result with a proper transparent background.
Not familiar with GIMP yet? Start with the GIMP beginner’s tutorial first — it covers all the core tools and concepts referenced below. And if you need to resize images in GIMP, that’s covered here too: How to Resize an Image in GIMP.
Which Method Should You Use?
Before diving in, here’s a quick guide to picking the right tool for your image:
- Method 1 — Fuzzy Select: Best for images with a clearly distinct background — a product on a light background, a logo with visible contrast between subject and surroundings.
- Method 2 — Select by Color: Best for flat, single-colour backgrounds — illustrations, icons, or simple graphics where the background is one uniform colour.
- Method 3 — Paths Tool: Best for complex images with detailed or irregular backgrounds — portraits, images with fine hair detail, or subjects with intricate edges. Takes more patience but gives you the most precise control.
The Essential First Step: Add an Alpha Channel
Before using any of the three methods, there’s one step every approach shares — and skipping it is the most common mistake beginners make.
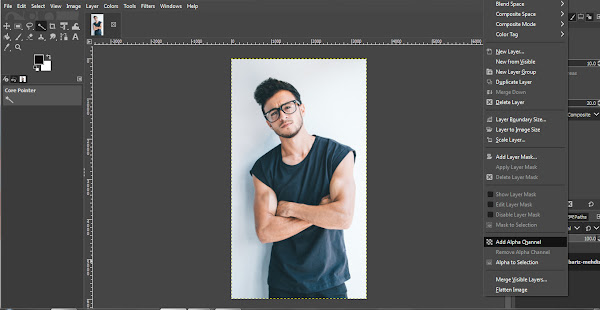
Add an Alpha Channel to your image layer. Without it, when you delete the background, GIMP fills it with white instead of making it transparent. The Alpha Channel is what tells GIMP that “deleted” means transparent.
To add it: right-click your layer in the Layers panel (bottom-right of the screen) and select Add Alpha Channel. If the option is greyed out, it’s already active and you’re good to go.
Method 1: Fuzzy Select Tool
The Fuzzy Select tool (sometimes called the “Magic Wand”) selects a region of your image based on colour similarity. Click somewhere in the background and GIMP selects all adjacent pixels of a similar colour. It’s fast, intuitive, and works brilliantly when there’s clear visual separation between your subject and the background.
-
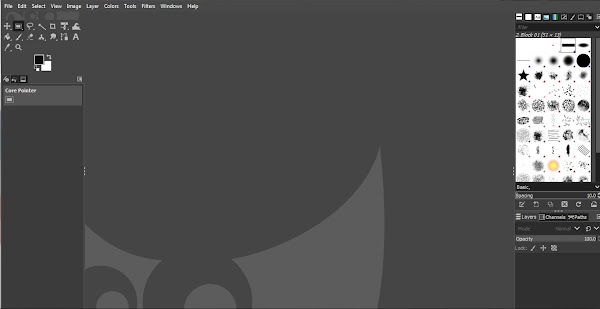
Open GIMP and double-click anywhere in the canvas area to open the file picker. Select your image.
-
Right-click the layer in the Layers panel (bottom-right) and select Add Alpha Channel.
-
Select the Fuzzy Select tool from the toolbox (top-left). If you can’t find it, right-click the Select by Color tool — Fuzzy Select is nested within the same group.
-
In the tool options panel, enable Antialiasing, Feather Edges, and Draw Mask.
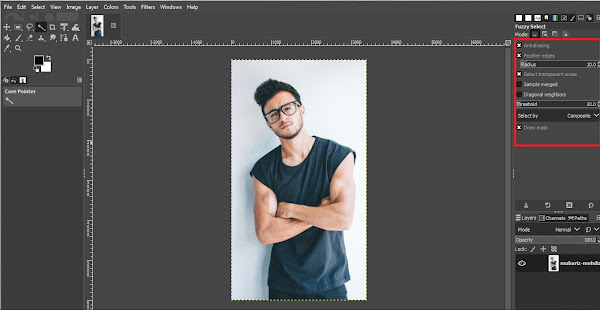
- Antialiasing smooths the edges of your selection so the cutout doesn’t look jagged.
- Feather Edges preserves fine detail along the boundary of your subject.
- Draw Mask overlays a coloured tint over the selected area so you can see exactly what’s been selected before deleting anything.
-
Click on the background area you want to remove. A pink or grey-and-white overlay appears over the selected region.
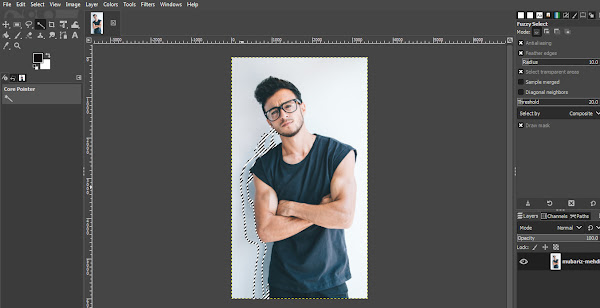
Tip: Click and drag instead of just clicking to expand your selection tolerance on the fly — dragging right increases it, dragging left decreases it. The background rarely gets fully selected in a single click, so repeat as needed.
-
Press Delete on your keyboard to clear the selection. If that doesn’t work, go to Edit → Clear.
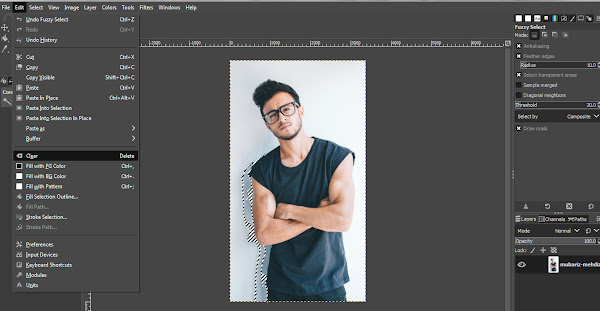
-
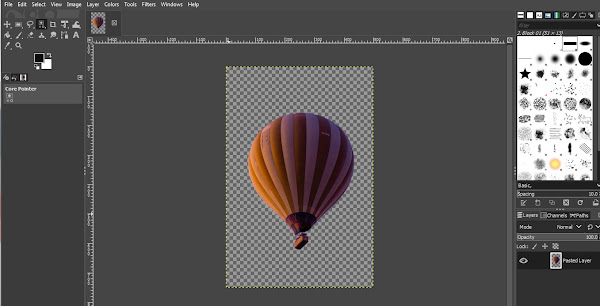
The deleted area turns into a grey-and-white checkerboard — that’s GIMP’s way of showing transparency. Repeat the selection and deletion process until the entire background is gone.

-
Go to File → Export As to save your file.
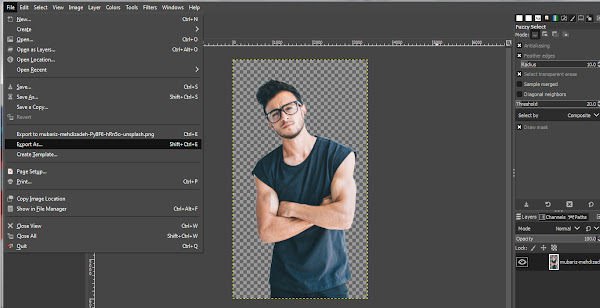
-
In the Export dialog, click Select File Type (By Extension) and choose PNG. Click Export.
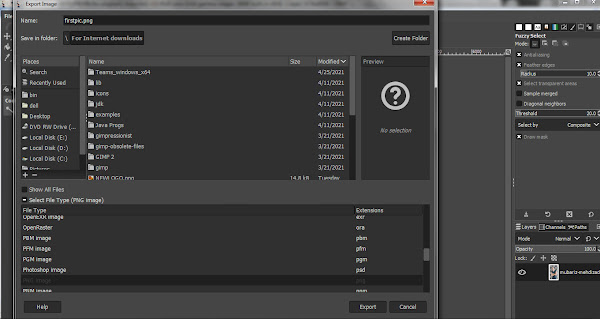
Why PNG and not JPG? JPEG doesn’t support transparency — it fills transparent areas with white. PNG is the correct format for any image with a transparent background.
Method 2: Select by Color Tool
Where Fuzzy Select picks adjacent pixels of similar colour, Select by Color selects all pixels of a similar colour across the entire image in one click — regardless of where they appear. This makes it the fastest method for illustrations, logos, or any image with a flat, uniform background colour.
-
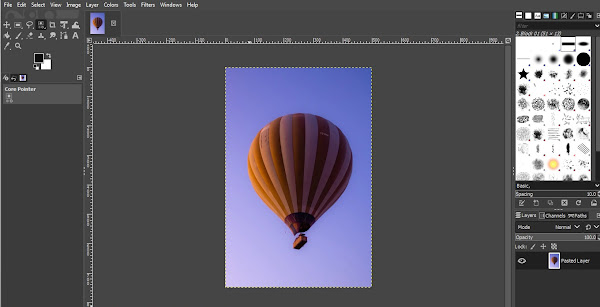
Open your image in GIMP and add the Alpha Channel as described above.
-
Confirm that Antialiasing, Feather Edges, and Draw Mask are enabled in the tool options.
-
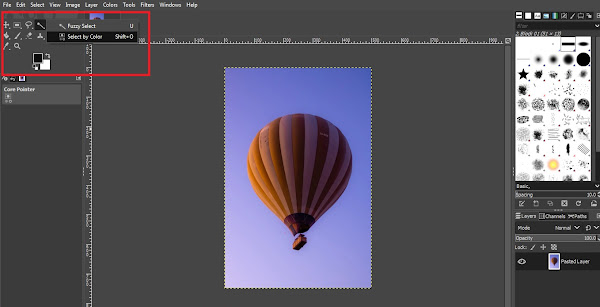
Right-click the Fuzzy Select tool in the toolbox and select Select by Color from the dropdown.
-
Click anywhere on the background. The entire background colour is selected across the whole canvas in one click.
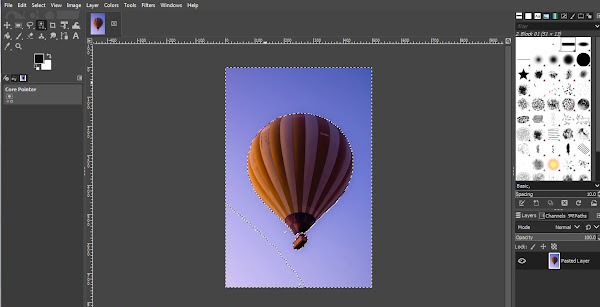
Tip: If you’re not selecting enough, hold Shift and click additional background areas to add them to the selection. To deselect an area accidentally selected, hold Ctrl and click it.
-
Press Delete (or go to Edit → Clear) to remove the background.
-
Save your file via File → Export As, selecting PNG as the format.
Method 3: Paths Tool
The Paths Tool is GIMP’s equivalent of the Pen Tool in Photoshop. Instead of relying on colour detection, you manually draw a precise outline around your subject. It takes longer, but gives you complete control over exactly what gets removed and what stays.
This is the method to use when your subject has complex edges — hair, fur, tree branches, or anything where the boundary between subject and background is irregular or detailed.
-
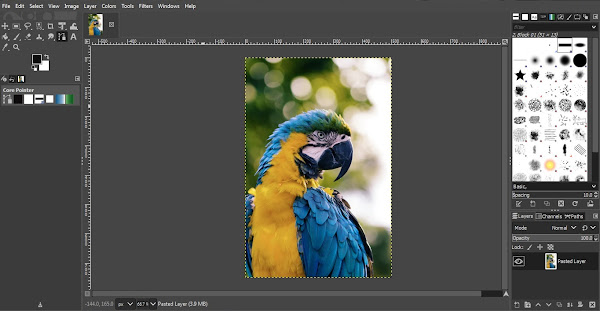
Open your image in GIMP and add the Alpha Channel.
-
Select the Paths Tool from the toolbox (top-left).
-
Click around the edge of your subject to place anchor points, building an outline around the part you want to keep. Each click places a new anchor; drag the handles to curve the path around rounded edges.
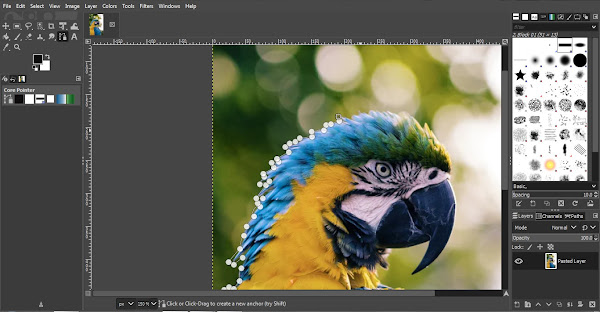
Tip: Zoom in using the + key to trace fine details accurately. The more precise your path, the cleaner your final cutout.
-
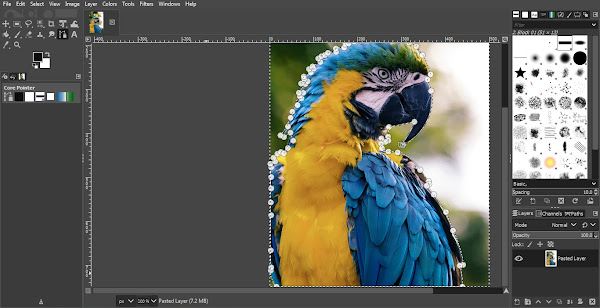
When you’ve traced all the way around your subject, close the path by holding Ctrl and clicking the very first anchor point you placed.
-
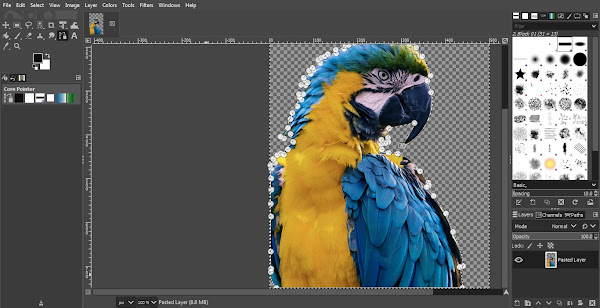
Press Enter to convert the path into a selection — marching ants appear around your traced area.
-
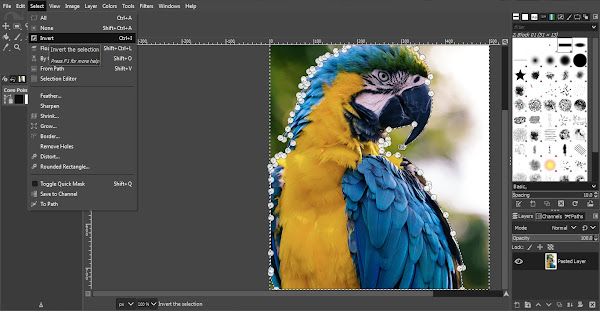
Invert the selection: go to Select → Invert. This switches the selection from your subject (what you want to keep) to the background (what you want to delete).
-
Press Delete (or Edit → Clear) to remove the background.
-
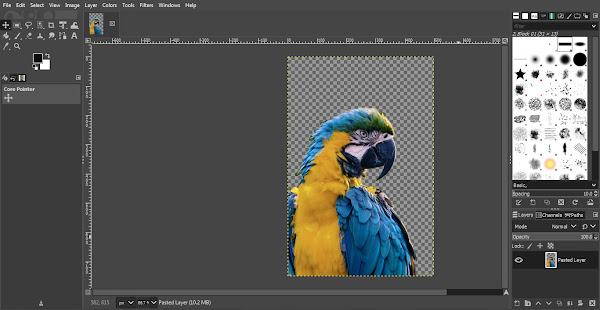
Go to Select → None to clear the selection outline.
-
Export via File → Export As, saving as PNG to preserve the transparency.
Frequently Asked Questions
Q: Which GIMP method is best for removing backgrounds?
A: Use Fuzzy Select for images with clear contrast between subject and background. Use Select by Color for flat, single-colour backgrounds like illustrations or icons. Use the Paths Tool for complex images with detailed edges — portraits, hair, or irregular boundaries. Each method works best for a specific image type.
Q: Why does my deleted background turn white instead of transparent in GIMP?
A: You haven’t added an Alpha Channel. Right-click your layer in the Layers panel and select Add Alpha Channel before deleting the background. Without it, GIMP fills deleted areas with white instead of making them transparent.
Q: Should I save a transparent background image as PNG or JPG in GIMP?
A: Always PNG. JPEG doesn’t support transparency — it fills transparent areas with white when you export. Use File → Export As → Select File Type → PNG.
Q: How do I get clean edges when removing a background in GIMP?
A: Enable Antialiasing and Feather Edges in the tool options before selecting. Antialiasing smooths jagged edges. Feather Edges preserves fine detail along the subject’s boundary. For the cleanest result on complex subjects like hair, use the Paths Tool with close zoom-in tracing.
Q: Can I use GIMP to create white background product photos for Amazon and Flipkart?
A: Yes. Remove the background using any of the three methods above, then add a new white layer behind your subject (Layer → New Layer → fill with white). Amazon India requires pure white — RGB 255,255,255 — at 1000×1000px minimum. Flipkart also requires 1000×1000px. Export as JPEG for both platforms or PNG if you need to maintain transparency for other uses.
Conclusion
Three methods, three different image types — and now you know which one to reach for. Fuzzy Select for images with clear contrast, Select by Color for flat uniform backgrounds, and Paths Tool when you need precise manual control over complex edges.
The result — a clean PNG with a transparent background — is ready to drop into any design: a product listing, a YouTube channel icon, a presentation, or anywhere else you need it.
Stuck on any step, or dealing with a tricky image where none of these methods is giving you a clean result? Drop a comment below — happy to help you work through it.
Selling products online in India?
Background removal isn’t just a design skill — it’s a marketplace requirement. Amazon India mandates a pure white background (RGB 255,255,255) at 1000×1000px minimum for all main product images. Flipkart requires the same 1000×1000px standard. Listings that don’t comply get suppressed in search — regardless of how good the product is.
Most early-stage Indian D2C and ecommerce founders pay ₹200–500 per image to freelancers or agencies for this exact task. With GIMP, you can produce marketplace-compliant product images for free — and once you’ve learned the workflow, it takes under 10 minutes per product. We’ve put together a complete zero-budget visual asset guide for Indian founders selling on Amazon, Flipkart, and their own D2C websites.
Related Articles
Read next

How to perform Google Image Search
You’ve probably used Google Image Search dozens of times without knowing half of what it can do. Most people treat […]
Read More
How to Resize an Image in GIMP
Got an image that’s too large to upload, or too small to print properly? Whether you’re prepping visuals for a […]
Read More
What is GIMP? A Complete GIMP Tutorial
Photo editing has gone from a niche professional skill to something virtually everyone needs at some point — whether you’re […]
Read More