What is GIMP? A Complete GIMP Tutorial
Photo editing has gone from a niche professional skill to something virtually everyone needs at some point — whether you’re putting together a YouTube thumbnail, cleaning up a product photo, or building marketing visuals. And the tool most beginners reach for first is Adobe Photoshop.
The problem? Photoshop runs on a monthly subscription. For someone starting out or working on personal projects, that cost is hard to justify before you’ve even validated whether photo editing is a skill worth investing in.
Enter GIMP — the GNU Image Manipulation Program. Free, open-source, cross-platform, and genuinely powerful. Most of the concepts you learn in GIMP — layers, selection tools, blend modes, filters — transfer directly to Photoshop and every other professional editing tool. So you’re not just learning GIMP. You’re building a foundation for professional photo editing that works anywhere.
In this tutorial, I’ll walk you through what GIMP is, how to install it, and how to create your first complete design from scratch — patterned background, logo, styled text, drop-shadow effect, decorative border, and final export included.
What is GIMP?
GIMP (GNU Image Manipulation Program) is a free, open-source photo editing application available for Windows, macOS, and Linux. Despite being free, it offers a professional-grade feature set — layer-based editing, advanced selection tools, filters, colour correction, script automation, and much more.
One of GIMP’s biggest advantages for learners is that its terminology and workflow closely mirror other editing tools. Once you understand how layers work in GIMP, they work the same way in Photoshop, Affinity Photo, and every other professional editor. You’re not locked into a proprietary system — you’re learning universal skills.
It has no watermarks, no free tier limitations, no subscription, and no hidden costs. Download it once and use it indefinitely.
Understanding the GIMP Interface
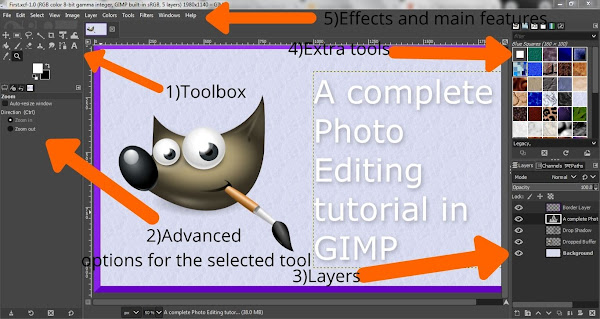
Before diving in, here’s a quick breakdown of the main GIMP interface panels — so you know what you’re looking at:
- Toolbox: The primary toolkit — selection tools, paint tools, transform tools, text tool, and more. Everything you actively use to manipulate an image lives here.
- Tool Options: Directly below or beside the Toolbox. Shows the advanced settings for whichever tool you currently have selected. Select the Text tool and you’ll see font, size, and colour options here.
- Layers Panel: Every element you add to a design creates its own layer. Layers let you edit each component independently without affecting the others — this is fundamental to non-destructive editing.
- Brushes / Patterns / Extra Tools: The panel on the right gives you access to GIMP’s built-in brush presets, fill patterns, and other resources.
- Menu Bar: The top menu bar (File, Edit, Select, View, Image, Colors, Tools, Filters, Windows, Help) is where most of GIMP’s deeper features and effects are accessed.
Step 1: Download GIMP
Go to the official GIMP download page at gimp.org/downloads. The page automatically detects your operating system and recommends the right version for your system.
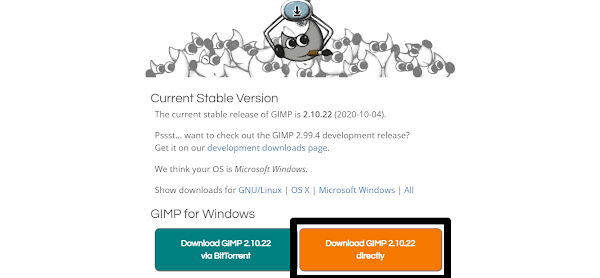
Click Download GIMP directly and wait for the installer to finish. Always download from the official site — gimp.org — not from third-party download aggregators.
Step 2: Install GIMP
Once the download completes, navigate to your Downloads folder and locate the installer file — named something like gimp-2.10.xx-setup.exe on Windows.
Double-click it to launch the installer. Allow the permission prompt. The installation runs automatically — click Finish when complete.
To launch GIMP: press the Windows key and type GIMP — it’ll appear in your Start menu. On macOS, find it in your Applications folder.
The first launch takes 15–30 seconds as GIMP initialises its resources. Subsequent launches are faster.
Step 3: Create Your First Design in GIMP
Here’s the design we’re building from scratch in this tutorial:
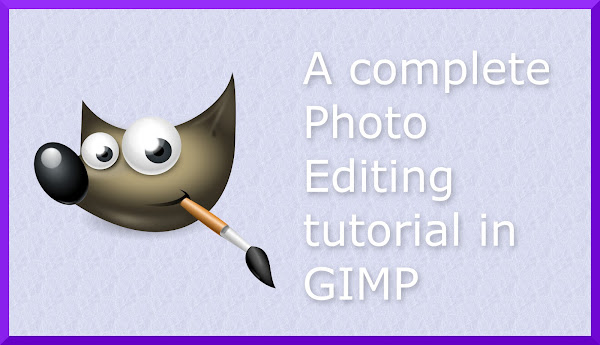
It includes a patterned background, a GIMP logo, styled text with a drop-shadow effect, and a decorative border. Follow the steps below.
1. Launch GIMP
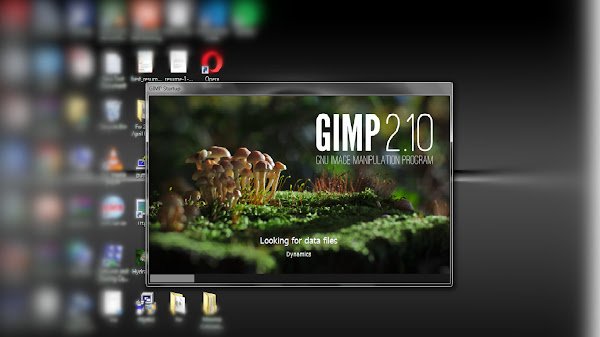
Open GIMP. Give it a moment to load fully before proceeding.
2. Create a New Canvas and Set a Background
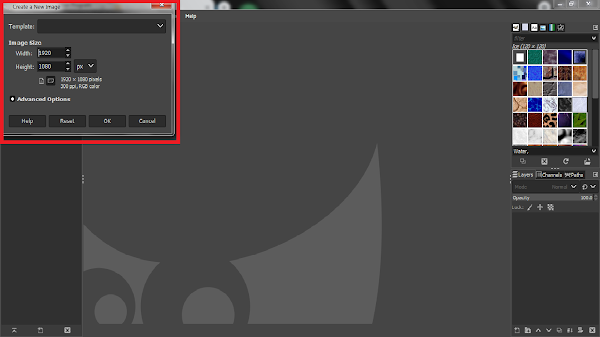
Go to File → New. A dialog box opens asking for canvas dimensions. The default is 1920×1080px — suitable for most use cases. Adjust if you need a different size, then click OK.
You’ll have a blank canvas. To replace it with a pattern background, locate the Patterns tab in the top-right panel.
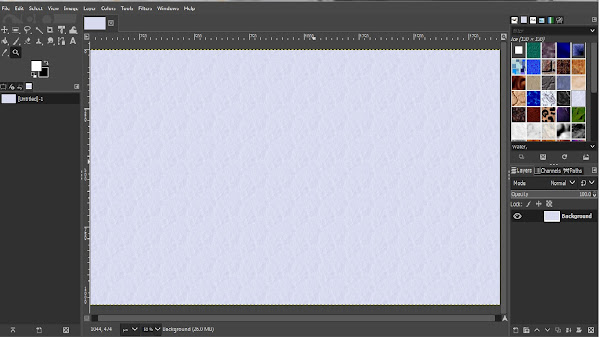
Browse the available patterns, select one, and drag it directly onto the canvas. It fills the background instantly.
3. Add the GIMP Logo
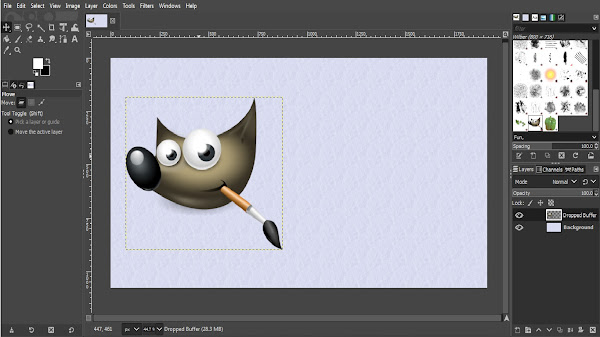
Switch to the Brushes tab in the top-right panel and scroll down to find the GIMP logo brush. Drag it onto the canvas and position it towards the left side of the image.
Tip: If the logo appears too large or small, scale it using Tools → Transform Tools → Scale.
4. Add Text
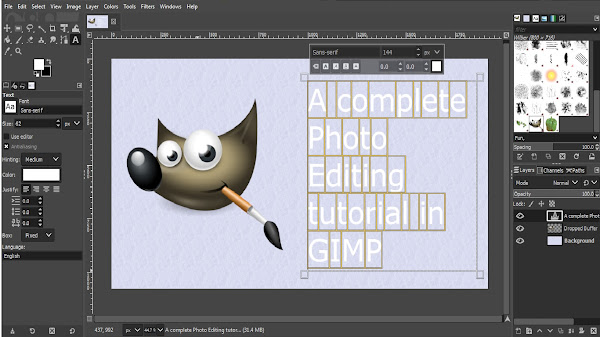
Select the Text Tool from the Toolbox (the A icon). Click and drag to draw a text box on the right side of the canvas, then type your text.
With the text selected, set the font size to approximately 144px using the floating control bar that appears above the text box. Change the font and colour from the Tool Options panel.
5. Add a Drop-Shadow Effect to the Text
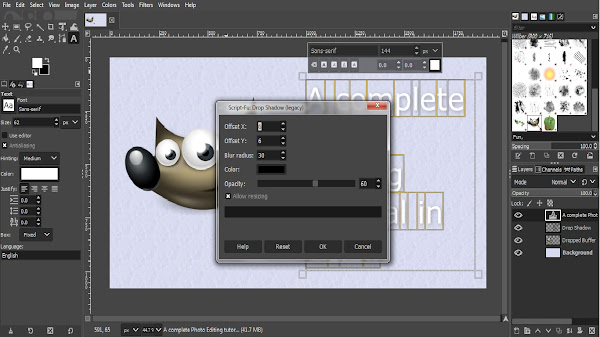
White text on a light background disappears without treatment. A drop-shadow solves this immediately.
With your text layer selected, go to Filters → Light and Shadow → Drop Shadow (Legacy). Set:
- Offset X: 6
- Offset Y: 6
- Blur Radius: 30
Click OK. The shadow is applied and the text now stands out clearly against the background.
6. Add a Decorative Border
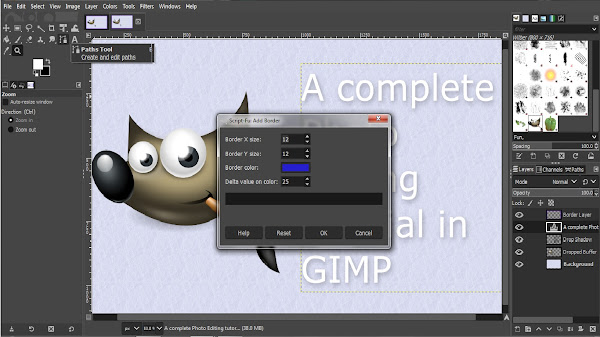
Go to Filters → Decor → Add Border. Use these settings:
- Border X Size: 12
- Border Y Size: 12
- Border Color: Dark blue (or any colour that suits your design)
- Delta Value on Color: 25
Click OK and the border frames your image.
7. Export Your Finished Image
This is the step that trips up every GIMP beginner — and it’s important to get right.
File → Save saves in GIMP’s native .xcf format. This preserves layers and editing history but cannot be used as a standard image file — you can’t upload an .xcf to a website, share it on WhatsApp, or open it in another app.
To export as a usable image, use File → Export As. In the dialog, click Select File Type (By Extension), choose JPG (for photos and designs) or PNG (for images needing transparency), and click Export. Confirm on the next dialog.
Your image is saved. That’s your first complete GIMP design — built from scratch.
Frequently Asked Questions
Q: Is GIMP really free — no hidden cost?
A: Yes. GIMP is completely free and open-source — no subscription, no watermarks, no premium tier, no hidden costs. It is maintained by the GNU project and is available for Windows, macOS, and Linux indefinitely.
Q: Is GIMP good enough to replace Photoshop?
A: For most tasks — photo editing, background removal, image resizing, compositing, text design, and basic filters — yes. Professional retouchers working at the highest commercial level may find some Photoshop-specific tools missing, but for the vast majority of use cases GIMP does the job without compromise.
Q: Why does File → Save in GIMP not create a JPG or PNG?
A: GIMP’s File → Save saves in its native .xcf format, which preserves all layers and editing history. To export a standard image file, use File → Export As, select your format (JPG, PNG, WEBP), and click Export. This is the most common confusion for GIMP beginners.
Q: How long does it take to learn GIMP?
A: Basic competency — enough to edit photos, remove backgrounds, resize images, and create simple designs — takes most people 3–5 hours of practice. The interface has a steeper initial learning curve than consumer tools like Canva, but the skills transfer to all professional editing software.
Q: What is the difference between layers and regular image editing in GIMP?
A: Layer-based editing means each element of your design sits on its own independent layer — background, logo, text, and effects are separate. You can edit, move, or delete any element without affecting others. This is called non-destructive editing and is fundamental to professional image editing in any tool.
Conclusion
GIMP has a learning curve, but it rewards the effort. Once you’re comfortable with the basics — creating canvases, working with layers, applying filters, and exporting correctly — you have a genuinely professional tool at your disposal that costs nothing.
The concepts covered in this tutorial — layers, drop-shadows, filters, export formats — are the same ones that underpin every professional editing workflow. You’re not just learning a free tool. You’re building transferable skills.
Want to go further? Here’s what to learn next:
- How to Resize an Image in GIMP Without Losing Quality →
- How to Remove a Background in GIMP — 3 Methods →
Got stuck at any step, or want to try a specific effect next? Drop a comment below — happy to walk you through it.
Building a startup in India on a bootstrapped budget?
GIMP is one piece of a zero-cost visual production stack that Indian startup founders can build before spending a rupee on design tools. Canva Pro at ₹4,000/year and Adobe Creative Cloud at ₹55,000/year are two of the most common early-stage expenses that most founders don’t need yet.
With GIMP for photo editing and background removal, Inkscape for vector graphics and logos, Canva free tier for social media layouts, and Upscayl for AI image upscaling — you can produce professional marketing visuals, marketplace-ready product images, pitch deck graphics, and brand assets entirely for free.
We’ve put together the full guide on building this stack — what each tool does, what it replaces, and when it makes sense to upgrade to paid alternatives.
Related Articles
Read next
How to perform Google Image Search
You’ve probably used Google Image Search dozens of times without knowing half of what it can do. Most people treat […]
Read More
How to Resize an Image in GIMP
Got an image that’s too large to upload, or too small to print properly? Whether you’re prepping visuals for a […]
Read More
How to remove background in GIMP?
We’ve all been there — you’ve got a logo, a product photo, or a portrait and you need the background […]
Read More